
STEP BY STEP PROCEDURE TO DO WATER PROOFING OF TOILETS
Last updated on February 5th, 2025 at 05:32 pm
Table of Contents
STEP BY STEP PROCEDURE TO DO WATER PROOFING OF TOILETS
Step-1: Surface Preparation
Post completion of masonry partitions, chasing and set up of hid electrical conduit pipe and plumbing pipe, verify for leakage by strain – 10 kg/cm2 ,for any leakages.
Plaster the wall and publish curing of 07 days, take the complete space for waterproofing.
A Difference within the ranges of bathroom slab and flooring slab is normally known as as sunk. Generally, a sunk of 150mm to 200mm is supplied to the slab of bogs blocks.
The sunk is required for laying drainage pipes (normally 110 mm dia PVC) and flooring/Nahni Trap (peak of 75 to 100 mm) accommodating drainage for bathtub provision like bathe, wash basin, bathtub tub and so on.
STEP BY STEP PROCEDURE TO DO WATER PROOFING OF TOILETS
The first step could be floor preparation to obtain waterproof constructed up, slab sunk floor must be cleaned to take away dust, mud, laitance, comfortable mortar and all loosely adhered particles.
Step-2: Testing the Substrate – Water Ponding Test
For finest outcomes, It is all the time advisable to verify the situation of Concrete slab because it’s the substrate for receiving waterproofing constructed up.
The cleaned concrete floor is subjected to water ponding by permitting water to face (for 48 hrs) on the ready space.
The floor is inspected for any leakages, dampness, dripping, if the identical is noticed it must be rectified by crack filling the seen cracks on slab and Injection Grouting as per the process defined in Step 3.
Step 3: Strengthening the substrate – Crack restore and Grouting
Visible cracks to be sealed by creating “V” groove, making the within of the crack greater (< ¼ “) than it are at the surface, this helps the repair material (non- shrink repair grout) bond with the crack.
Followed by attending cracks, the Injection grouting is done using injection grout pump with a non- shrink cement or grout at leakage points or at the well distributed the points (grid of 2’X2’) this makes the substrate concrete slab less porous.
Step-4: Water proof Built-up
A. Plumbing / Pipe Insertions
All the Pipe inserts must be installed prior to the application of waterproofing system on the sunken slab.
The opening on punctured the walls around the pipes should be packed using with a mix of Cement and Sand (1:3) mix with Styrene Butadiene Bonding emulsion chemical, at least 48 hours prior to application of waterproofing.
How To Do Bathroom Waterproofing? Bathroom Waterproofing Kaise Kare?
B. Prewetting the Surface
The slab should be Pre-wetted to make it saturated or free water to be drained using a dry cloth.
C. Application of Base Coat
Applying a coat of the cement slurry with waterproofing compound (proportion as per manufacturer instruction ).
The coat has to be extended on the masonry the wall atleast 2’ above sunk (this will protect the common wall against dampness due to capillary action).
Apply the another coat of cement the slurry with waterproofing compound (second coat) after 06 hrs of first coat.
Protect the base coat with 1/2” thick mortar (1:4, admixed with waterproofing compound) to guard the bottom coat towards any puncture whereas constructing successive layers
Once the bottom coat is protected, the layer must be examined for any leakage by water ponding check for 72 hrs.
If no leakages are noticed, then you may proceed with sunk filling by brick bat. Incase leakage is noticed, the complete base coat has to redone.
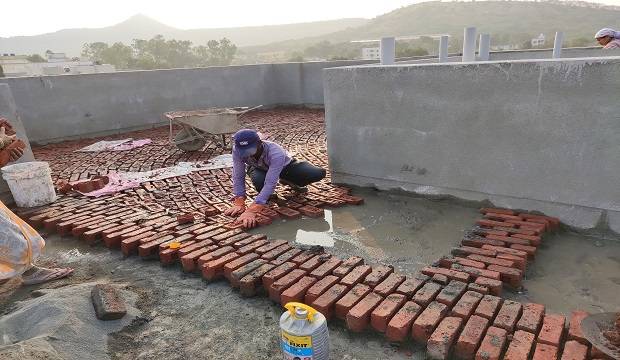
D. Brick Bat Coba layer
Brick bat layer function economical sunk filler as they’re accessible simply at any website and in addition mild weight compared to concrete.
Please notice they immediately don’t contribute to waterproofing.
Brick bats will be changed by AAC (Autoclaved Aerated cement) block bats, foam concrete or EPS (Expanded polystyrene) Concrete.
Laying of sound brick bat coba (~100mm thk.) at required gradients, slope between ¼” to ½” per ft. Proper hole must be maintained between the brick bat no more than 10mm to 15mm with staggered joints.
E. Filling Joints between Brick Bat Coba
Fill joints with CM 1:4 together with water proofing compound (dosage as per manufactures). Perform curing for 03 day.
F. Finishing of Corners and Vertical Stands
The corners and vertical up stands (2’ above sunk) are completed with CM 1:1 (12 mm thick) admixed with the water proofing compound (dosage as per manufactures).
G. Finishing Brick Bat Coba
Finish brick bat coba with joint much less water proofing screed (Cement:Sand Mortar of 1:3) admixed with water proofing compound (dosage as per manufacture’s advice).
The floor must be completed easy and checked for slope verify. Also guarantee correct ending round Nani traps/inserts.
H. Check for Leakages (water Ponding Test)
Go for water ponding check (process as defined earlier) and verify for any leakages
I. Final Curing
Cure the highest end layer (Above the brick bat) for no less than 7 days
Tips for Waterproofing (Points to be Remembered)
- The never miss the waterproofing of vertical wall upto 2’ peak above the sunk portion.
- Always verify and strengthen the substrate concrete slab (receiving the waterproofing buildup).
- Do water ponding assessments at varied phases to find out any damages within the waterproofing course through the buildup.
- All plumbing inserts and drainage pipes are to be checked for joint leakages.
- All plumbing traces (hid) are to be checked for joint leakage and strain score
Best Civil Engineer Pune
About Author
Best Architect in pune
View All Posts