
Internal External Plaster Work Procedure
Last updated on February 5th, 2025 at 05:06 pm
Table of Contents
What is plastering work?
Plastering work is a vital a part of development initiatives; the explanation for plastering within the first place is to cowl uneven surfaces of the blockwork or masonry work.
The function of the plastering is to cowl blockwork, masonry work, columns & the construction of the constructing with cement sand mortar.
Plaster helps with the safety of the wall from hearth, rainwater, leakages of water on the ceiling space. Just like RCC & blockwork, Plastering performs an necessary function to make a construction sustainable.
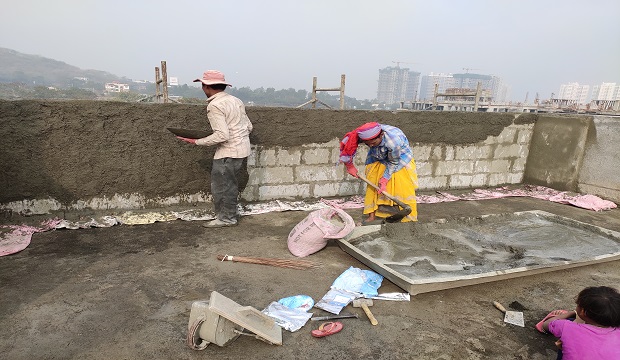
Internal External Plaster Work Procedure
Material required: For What is plastering work?
1) Cement
2) Sand
3) Water
4) Admixtures if required.
5) Sanla (Neeru)
IS Code for used for plastering work:
Indian requirements (BIS codes)
IS 1661 : 1972 (reaffirmed 2001) : Code of follow for software of cement & cement-lime plaster finishes.
IS 1542 : 1992 (reaffirmed 2003) : Sand for plaster
IS 1489 for portland pozzolona cement.
IS 8112 for grade 43 OPC.
Tools required for plastering work:
1) Mortar pans(ghamelas)
2) Spade (Phavadas)
3) Chisel (chinni)
4) Hammer
5) Trowel (Thapi)
6) P.V.C Water stage tube.
7) Metal float (Tipni)
8) Batten for making grooves (Patti)
9) Aluminum hole field part of 1.8m.
10) Right angle, small & huge
11) Measuring tape.
12) M.S corners.
(NOTE: Words utilized in brackets is the native language used on-site in India)
How To Check Plastering Work Quality at Site | Checklist For Plater Work of Building
Cement sand ratio for plastering work?
Mix Ratio
1:3 – Normally used for wealthy fill mortar which required to fill the cracks, restore work and typically in first coat of exterior partitions.
1:4 – Usually used for exterior partitions of the constructing
1:5 & 1:6 – Usually utilized in inner plaster works.
Let’s be taught the plastering work process in simple 5 steps:
1) Preparation of floor space.
2) Making of plaster combine
3) Applying base coat
4) Applying the ultimate coat.
5) Precautions & suggestions
1) Preparation of floor space:
floor preparation
1) Before beginning with plasterwork we have to guarantee that the blockwork or brickwork is positioned in the fitting place. This means there shouldn’t be any sort of errors in measurements of partitions.
2) To be certain that the measurements of partitions are right, you may examine the wall by thiyya setting/Bullhead (stage dots) technique OR merely 3-4-5 technique.
3) In brief, the extent dots/dhada technique is checked by fixing (line dori) on X & Y-axis & checking the fitting angle of the intersecting partitions by 3-4-5 technique. After checking the intersection of the wall, be sure you examine the bullhead (dhada) by similar line string (line dori).
Note: (Make certain you set the road dori(line string) on most size as a lot as potential.)
4) Now after checking that the wall is in the fitting measurements, do examine that each one work {of electrical} conduit pipes and switches needs to be executed earlier than plaster work.
5) Starting with preparation for the floor just be sure you clear the wall totally, no mud & free particles needs to be seen on the wall.
6) Make certain the wall is totally wetted in any other case the water in mortar will probably be absorbed by the dry breaks and the mortar will turn into brittle.
7) Make certain hacking work is finished on column & beam construction for higher bonding.
Note: (Hacking needs to be executed in 50nos. Notches per sft.)
8) Cover wired mesh extending as much as 3”-4”inch on the joint of masonry work and RCC construction. And conceal the electrical work to keep away from cracks.
9) Holes and joints in masonry partitions needs to be crammed with wealthy mortar earlier than fixing the hen mesh Wired mesh/chickem mesh
2)The groundwork for plaster:
cement sand ratio for plaster
1) Before beginning with plaster preparations, it’s essential put together bull dots(dhada) of 12-15mm horizontally and vertically on the partitions with a distance of 2m.
2) Now be part of the vertical bull dots(dhada) by making a vertical line of plaster. This vertical thick line will be part of the portion between higher bull dot and decrease bull dot.
3) Check the bull dots(dhada) by plumb bob technique for checking vertical alignment of plaster.
3) Use Cement mortar 1:4 proportion for ceiling plaster & 1:6 for wall.
4) Mix the elements in correct proportion and use the required quantity of water for a homogeneous combination.
3) Applying first or Basecoat of plastering work:
first coat of plaster
The most thickness for inner plaster needs to be between 12-15mm for inner & 20-25mm for exterior partitions.
The first coat (chatt) needs to be of 5-6mm thick. Hit the primary coat gently with a trowel (thappi) for higher binding between plaster and wall.
Start with ceiling work first & then with wall plastering.
Cement mortar combine for plaster should be consumed inside 30-45 minutes as a result of the setting time of mortar begins after 1hr.
The first coat shall be minimal cured for 3 days earlier than beginning the second coat.
The floor of the primary coat needs to be roughed or scratched earlier than it’s absolutely hardened in order that the second coat bonds nicely with the primary coat.
4) Applying Second or Final coat of plastering work:
ultimate coat plaster
The thickness of the second coat ought to differ between 6-7mm.
After the primary coat(chatt), be certain that there may be dampness within the wall earlier than making use of the second coat.
Apply the second coat, cowl the areas to match the thickness stage with bullhead dots(thada).
The plastered floor shall be made uniformed & leveled by utilizing screeds and checked by plumb bob.
Avoid extreme ending via float which ends up in crazing i.e small cracks on the plastered floor.
5) Precautions & suggestions:
The curing of the wall shall be executed after an interval of three hrs for 7 days.
Curing shall be carried out after 24 hrs of plastering work.
Avoid extra trowelling which ends up in cracks within the plaster wall floor.
To keep away from falling of plaster, be certain that racking out joints and roughening of background materials on base coat shall be carried out.
To keep away from cracks on the floor after few days of plaster, be certain that preparation of the floor shall be executed correctly & maintain plaster cool throughout its younger age with the assistance of gunny baggage & sprinkling water.
Too thick layer of plaster shouldn’t be utilized.
Quantity calculation for plastering work:
- I’ll inform you the best technique to estimate the amount of cement & sand by taking a pattern of 10sq.m space of the wall with a thickness of 12mm.
- The cement sand ratio for mortar will probably be 1:4 Note:(you may take any ratio from 1:3 to 1:6, in accordance with your necessities)
- Wet Volume of plaster= Area x thickness.
= 10sq.mx.012= 0.12cum.
( Note: 0.12 is thickness 12/ 100) - As you already know dry quantity of plaster is 33 % better than moist quantity
Required mortar for Dry quantity=1.33 x moist quantity
=1.33 x 0.12 = 0.1596cu.m. - The quantity of cement and sand required:
Mix ratio: 1:4
Cement quantity: 1/5×0.1596 = 0.03192 cu.m
Sand quantity: 4/5×0.1596 = 0.12768 cu.m - Quantity calculation:
Cement baggage= 0.03192 x 1440(cement density)
=45.96 kgs
Sand = 0.12768 x 35.28 = 4.504 cu.ft or 204 kgs
How many cement baggage per sq. meter for plastering work?
From the above talked about worth, we derived the amount for 10 sq.m
Cement amount for 1 sq.m cement= 4.596 kg
Sand required for 1 sq. m cement = 20.4 kg
Also Read This
About Author
Best Architect in pune
View All Posts